Wednesday, October 12, 2011

7 Keys to Proper Running Mechanics


It’s easy to zone out when you run, leaving stress in the dust and doing something beneficial for your physical and mental health. Just don’t lose sight of your technique.
“Staying mindful of your mechanics during a workout will save energy and reduce unnecessary movement to help you run stronger, with greater power and a more efficient stride,” says Craig Friedman, vice president of the Performance Innovation Team at Athletes’ Performance.
Assess your posture and stride rate using the seven keys that follow, courtesy of Friedman. You don’t need to focus on these coaching cues during your entire workout, but check in with yourself about every 10 minutes. This will help you run with intention, which alone will instantly improve your mechanics.
1. Pull your toes up
Most running injuries occur by running with your toes pointed down toward the ground. Aim to land through the middle of your arch by keeping your toes pulled up. Thinking about sliding your heel back and up underneath your butt. This will put you in the proper position to land on the balls of your feet.
2. Don’t overstride
Your feet should land beneath your hips, not out in front of your body. One way to avoid overstriding: Speed up your stride rate. If you’re running with a faster stride rate, you’ll pick your feet up and put them down quickly, making it very hard to overstride. Your feet should strike the ground roughly 170-180 times a minute. miCoach displays stride rate in every completed Workout Details chart.
3. Keep your torso engaged
Your abdominal muscles should stay flexed if you’re running tall. Try lifting your head as far away from your tailbone as possible to maximize the muscle contraction and train your core while you run. Another way to think about it: Focus on running tall as if a string was pulling the front your hips forward.
4. Relax the iron fist
Keep your hands lightly cupped, but don’t make a fist. Fists cause your forearms to tense up, which impedes proper shoulder motion. Also, be careful not to tense your fingers and slice through the air. This could cause your arms to move in a circular action instead of moving forward.
5. Keep your shoulders back and down
There’s a tendency to hunch over as you get tired. Resist it by keeping your shoulders back and down so your chest is lifted. Move your arms from your shoulder, like a pendulum, so your elbow angle remains the same.
6. Look for an angle
Keep your elbows fixed at right angles (bent 90 degrees) and pulled close towards your body. Don’t allow them to flare out. Your arm action will be more efficient.
7. Eyes up
Keep your head up and your eyes fixed on the horizon to stay tall and upright while you run.

Article taken from Adidas MiCoach

Tuesday, October 11, 2011

Twilight Saga E Books

By Stephenie Meyers
Just click on the titles to download. They're all in PDF File format. Enjoy!

Book 1 - Twilight
Book 2 - New Moon
Book 3 - Eclipse
Book 4 - Breaking Dawn 

Please CommentFacebook like or Retweet.


Monday, October 10, 2011

Acer Aspire 4530 Crystal Eye Webcam Fix

Finally! After almost 2 years of looking for a fix for my Acer Crystal Eye Webcam - from searching and downloading  drivers, changing OS, re-installing, reformatting, etc., etc., etc. All it needed was a simple check of the wire that goes through the hinge to and from the main board of the laptop! 


Acer Aspire 4530
Acer has never disclosed this information on their website and had always maintained a position that we had to download the correct driver (Suyin/Bison) for whatever operating system we were using. I have gone through changing from Vista to XP and vice-versa so many times I've lost count. I've tried Home, Premium, Professional, Ultimate, 32-bit, 64-bit, blah blah blah and would have the webcam work for awhile then it reverts back to the same problem - A grey or black screen!

Here is a very simple fix that you can do yourself. Don't worry, I've provided some screenshots/pics with this walk-through. Again, just make sure you have the correct webcam driver for your laptop.

Let's start with the tools you'll be needing and they're only two of them... a small Philips screwdriver and a flathead screwdriver. That's all!

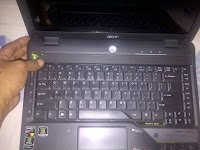
Now, what you will need to do is remove the front panel that's located just above your keyboard.


To do this, you will need to take out six screws at the back of your laptop (three of which are inside the battery enclosure).


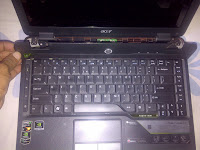
Now go back to the front the front of your laptop and slowly unhinge the front panel. You can use a small flathead screwdriver to pop it out/up. 


You will see to two wires leading/going through the hinges. The one on the left side is for your Wi-Lan and on the right is the wire for your webcam. All you need to do is make sure that they are not taut or constricted. Just push the wires in so that they have enough slack every time you open or adjust your screen/lcd.


Before putting back the front panel, try moving your screen forward and backwards to see if the wires are not taut or have enough slack. Once you're satisfied with it, put the front panel back in, put all the six screws back in (no more, no less) and lastly, your battery. That's it, you're done!


Turn your laptop back on and make sure that you engage your wi-fi button as well by depressing it so that it lights up. ENJOY!


Thursday, October 6, 2011

Harry Potter Books


Harry Potter ADOBE PDF FILE FREE DOWNLOAD
Complete Book 1 to 7

Download Link for Book 1 to 6: http://filesmy.com/2L5x85

Download Link for Book 7: http://filesmy.com/2L5ya

Kindly LIKE and SHARE with others!